This post will serve as an introduction to Linux escalation techniques, mainly focusing on file/process permissions, but along with some other stuff too.
You’ve gained some access to a machine and you need that root shell, but you don’t wanna run the risk of crashing the box through running whatever the latest kernel exploit is that Tavis Ormandy released this morning. So what do you do?
Intro to File Permissions
On Linux each file is associated with a set of permissions.
I’m logged in as user I have created for these examples, low. I’ve created a file with the touch command, and then simply listed the contents of the directory.

Okay, so what does all this information mean? Well, lets work our way from right to left.
- Starting off we obviously have the file name.

- Next we have the date/time the file was last modified, again straightforward.

- Now we have the size of the file. I haven’t added any contents to this file, so it’s empty (0).

Ownership
Now we’re getting to the important stuff.

What this section shows is the is ownership of the file. The value on the left is the user owner, while the right is the group owner.
Users on Linux can be part of multiple groups. By default you will be in a group of your own username.

As a note, to change file user/group ownership we can simply use chown. The syntax for this is:
chown user:group filenameIf you only need to change the group owner, changegrp is avaliable.
chngrp group filenameIf you only need to change the user owner, just use chown without the second half.
chown user filenamePermissions
Finally let’s look at the leftmost section. These are the permissions.

Linux file permissions are divided into three parts
Read (r)Write (w)Execute (x)
If none of the above apply, it will simply be displayed as (-).
So this section shows us if we have read, write, execute permissions. So why are these three values repeated three times?
This is because each file has r/w/x permissions associated for it’s user(u),group(g) and finally other(o), which is everyone else.
To set these permissions we have a few options.
To add individual permissions to a user we can use the following syntax. This command adds execute permissions(x) to the user that owns the file.
chmod u+x filenameTo remove this permission, replace the + with -.
chmod u-x filenameIf you want to edit the read(r) or write(w) permissions, just replace the x value in the above example with the appropriate character. Similarily, if you want to edit the permission for the group(g) or other(o), just replace the u value.
Alternatively we can do this numerically. Think of each rwx as three binary bits
e.g. rw- is 110, which is 6 in decimal.
Using chmod again, we can set the exact rwx permissions for each category (u/g/o) at once. For example to add rw- permissions to user (u), and r- - permissions to group(g) and other(o), use the following command.
chmod 644 filenameTo calculate this:
rw- r– r–
110 100 100
6 4 4
More Permissions
The final character on the end will represent whether the item is:
- a file
- - directory
d - symbolic link
l
Meanwhile the presence of a t indicates a sticky bit. This means only the file owner, the owner of the directory, or root can rename/delete that file.
There is another type of permission: the SUID/GUID bits. These stand for Set User ID and Set Group ID.
These bits tell the system to run the executable as either the owner or group owner of the file. They are indicated by an s in either the user execute permission or group execute permission. This means we can allow another user to run a command as either another user/group, or even root. If we can exploit this we would be able to escalate privileges.

We can set these much like earlier:
chmod u+s filenameSetUID is usually ignored on files containing shebangs (an example being #!/bin/bash you often see at the top of a file) for sensible security reasons, so generally it only works with binaries. For this reason you may see binary files acting as wrappers to call shell commands to work around this.
I’ll discuss the exploitation of these SUID/GUID bits more shortly.
Exploiting Sudo
The sudo command allows us to run a command as another user or root.
We can check if we’re able to run any commands with sudo for our current user with
sudo -lThis is a very good way to escalate privileges, as it’s a common misconfiguration.
As an common example of this, my low user has access to sudo a text editor (vim).

Using sudo vi will allow us to read/write anywhere arbitrarily, but not only that we can even drop down to a shell with :shell.


Many common binaries can be used in similar ways to escape to the shell with higher privileges. A few are listed below.
- cp,mv: You can write anywhere, so move or copy over /etc/passwd to add a user (kind of dangerous) or a SSH key.
- less,more: Call
!bash - man man: Again call
!bash - expect: Call
spawn bash, thenbash - awk: Run
awk 'BEGIN {system("/bin/sh")}' - Text editors: Like vi most of these have shell escapes.
If you have sudo access to any language interpreter (such as python, perl or ruby), you have a very convenient escalation method, just run whatever code you want with higher privileges.
If you don’t have sudo access to a language interpreter but you do have access to a language package manager (think Python’s Pip, Ruby’s Bundler, NodeJS’s NPM) etc. you can sudo install a custom package containing your executable code.
Exploiting SUID/GUID
As we now know, these type of files should be very useful for escalating privileges. Before we can attempt to exploit SUID though we need to find some targets via some quick enumeration.
To locate SUID files
find / -perm -u=s -type f 2>/dev/nullTo locate GUID files
find / -perm -g=s -type f 2>/dev/nullAs it’s impossible to list all the types of exploitable executables that could be running under sudo/SUID/GUID, it’s good to know how to enumerate them yourself. This way you know if you can abuse them and hopefully execute code in an unintended manner. To do so you should investigate the behaviour of the executable thoroughly, including researching any “features” that might be able to be exploited. You can do this through checking any extra arguments ( with program_name -h) or by further research using man program_name.
Google is also a solid resource to find more details about a given executable. However if you are dealing with a compiled home-grown application binary or just one with no source code avaliable you may need to reverse engineer it. This is out of scope of this tutorial.
Now I’ll list some common techniques for exploiting SUID/GUID and sudoable executables to escalate privileges.
Exploiting SUID/GUID/Sudo with writable files
Self explanatory: If a SUID bit is set on a file/file is sudoable while also being world writable or at least writable by our user we can insert whatever code we want into it and use it to escalate privileges when we run it.
Exploiting SUID/GUID/Sudo with Command Injection
If we can inject commands on a binary with SUID enabled we can escalate privileges. This is pretty much the same as regular command injection other than the aspect that we’re running code with higher privileges. For this I’m going to use a slightly edited example from OWASP’s Command Injection Page
Example
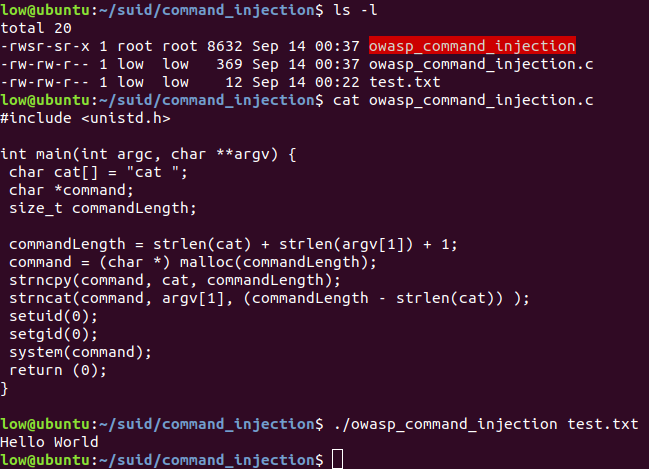
This binary simply calls the system cat command, but allows us to supply an argument.
By performing some basic command injection, we can execute the cat command and then another command of our choosing.

If we get command injection like this in a SUID binary, escalating is easy.
Exploiting SUID/GUID/Sudo with PATH
Note: This following technique can work with sudo, but generally sudo is configured in way where your path and environment variables don’t get preserved. If env_reset is disabled you may be able to exploit this. More Information
Lets say we’ve found a SUID binary. We can see that it’s calling the system shell. In this situation we weren’t able to exploit it by supplying an argument for command injection because our argument doesn’t get passed down to the call to the shell, so what is another method to exploit this?
Example
This binary calls the system shell with the harmless id command. One thing that this binary doesn’t do however, is list the full absolute path of id (in this case /usr/bin/id). This is great for priv esc, because if we have the ability to edit our own path, we can redirect the execution to a binary we supply ourselves. This works for any binary really, id is just an example.
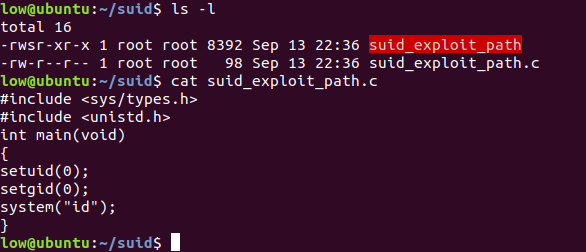
I’ve provided the source code above, but in the case we can often identify the command from the binary with strings filename or some reverse engineering.
Running the compiled file runs the id command as expected, showing us it is running as root.

I quickly make an exploit file and compile it.

Since the call to id does not list the absolute path. I can exploit this by editing my own path variable to point to another directory. When the shell calls for an executable like id, it looks through all the locations on the PATH and when it obtains the first instance of a file matching the name, it will attempt to run it.
Therefore by setting my own path to point to the directory I’m currently in first (/home/low/suid) and then renaming my exploit binary to id, execution can be redirected to the evil id rather than the real one. 
export PATH=/exploit/code/location:$PATHAs you can see calling the binary runs the evil id and the exploit code within.

Running which id after we edit the path shows us the actual location of the binary that we will run if we call id, this is the evil one.

Before editing the path we can see id points to the correct location /usr/bin/id.

Exploiting SUID/GUID/Sudo with Environment Variables
This is the same logic as exploiting using the PATH method. Just set the environment variable instead of your path.
Exploiting SUID/GUID/Sudo with Symlinks
Let’s say you find a SUID binary. It does some harmless action like tar ing up a folder. In this situation you’re not able to write to the binary, you can’t inject code, the shell call to the executable has it’s absolute path listed and even environment variable injection won’t seem to work.
You can however add files to the directory it tars. Note: This method isn’t exclusive to tar, and should work with similar methods like zip, cp -r and so on
Example
The following example is pretty unlikely and is just for educational purposes, because it relies on the dumb mistake of using the -h argument on tar. This argument indicates to archive the actual file being referenced by a symlink rather than the symlink itself.
We found a backup script with SUID set that tars up a folder we own (work_folder), before extracting it with the current timestamp and giving our low user ownership of the extracted directory.

System call looks like this:
/bin/tar cfh /home/low/suid/symlink_example/backup.tar /home/low/suid/symlink_example/work_folder
folder=$(date +%Y%m%d_%H%M%S)
mkdir "$folder"
/bin/tar xf /home/low/suid/symlink_example/backup.tar -C "$folder"
chown low:low -R "$folder"
We would like to read a secret file that we don’t have access to within /root.

Regular users can still set symlinks to locations they can’t access. So by creating a symlink to /root called “work_folder” as the low user, we can cause the program to include the contents of /root in the backup instead of whatever files it was supposed to be backing up. Once the script is done extracting the backup and gives us ownership of the file, we should be able to read the files within.


Symlink behaviour is often ignored by default depending on the application; so this can partly rely on a little bit of a misconfiguration too. However it’s still worth trying to determine if it is possible to cause a SUID file to behave in an unintended way by abusing them. This type of attack can work for writing and executing files too.
Exploiting SUID/GUID/Sudo with Wildcards
So we’ve found a SUID executable, a cronjob that runs as root, or a script we have sudo permissions to run. We don’t have write access to it. We can’t inject commands using it. Binary paths are all properly configured. But we notice that the command being ran has an asterix * present in an argument and that we can add files to the directory this asterix is being used in.
Due to the way the shell expands the asterix, we can actually use this to inject arguments. While this isn’t a guaranteed way to escalate privileges, if we’re lucky the binary being called has an argument that allows us code execution.
Wildcard Injection Example (ls)

Here is an example, note that when I call ls * when the directory contains only the file blah, I get the normal expected output. Yet when I add a file with the filename of an argument for ls (-la) the file gets interpreted as an argument. This is the basis of wildcard injection.
Wildcard Injection Example (binary calling tar)
Now let’s try with a SUID binary. I’ve provided the source code here.

If we don’t have access to the source code, we can use strings or some reverse engineering to see if we can find anything that looks like a shell command.
To exploit this we can use the same technique as earlier, this way we can actually cause code execution. This is because tar has an argument --checkpoint-action=exec=yourcodehere that will run a command you supply after it reaches a certain checkpoint.

I put in a quick python reverse shell in rs.sh, set up my listener with netcat and then run the binary. In my other terminal,I can see I recieved a root shell!


More Info: Unix Wildcards gone Wild
Exploiting File Capabilities
Following on from what we now know about SUID/GUID files on Linux, we can see how enabling a file to have one of those bits provides a lot of power, and so we need to carefully consider where we use this feature. If a file has a SUID bit to run as root, it has the power to do everything that root can.
So you may be thinking something along the lines of this; my script/program needs root to do something specific that can’t be fixed by adding it to a group and giving it appropriate file permissions. What if I need to bind to a port under 1024 or set the system time? Do I really need to have to grant my script root privileges, allowing it to do anything if it were to be exploited?
Well the answer is no. Over the past few years work has been implemented within the kernel to try to break down the need to run something as a fully privileged process. This feature is called Capabilities.
Think of your smartphone, unless you’re a luddite, amish or Richard Stallman*. When you install an application from the App/Play store, you’re granted a list of permissions before installing it. You may even be prompted when you’re using it for some specific intrusive permission, such as location detection.
This is a little bit like what capabilities are for. Rather than granting a file full root privileges when ran with a SUID bit or sudo, we can instead give it specific powers.
So following on from an example earlier, I want to bind a program, let’s imagine it’s some janky custom webapp I’ve created to a port under 1024, in this case it would likely be 80. My choices are:
- Run this program as root to bind the port correctly.
- Use the
CAP_NET_BIND_SERVICEcapability to grant the specific ability to bind to the port, while not providing any other root powers.
So let’s play with an example. I’ll call Python’s inbuilt SimpleHTTPServer on port 80.
When I run that with my non root user though, we get a permission denied error. 
To add the capability to bind to this port, use the following command. You of course need root permissions for this.
setcap cap_net_bind_service=+ep filename
As we can see, we can now bind to port 80 successfully.

And use the following command to view capabilities.
getcap filename
Now that we understand what capabilities are, how can we use them to our advantage?
Exploiting programs with capabilities should be the same thought process as that of SUID executables, except it’s a little more tricky as we’re limited in what we can do.
I recommended checking if the file you’re exploiting first has capabilities with getcap, and then checking the link above for what that capability is. If you’re lucky with which capabilities are present, and the program is designed in a way where you can exploit that somehow, you might have a path to privilege escalation.
*I joke I love you Richard
Example.
The CAP_DAC_OVERRIDE capability bypasses file r/w/x permission checks. If a program has this capability enabled, we can essentially read/write/execute any file when it is ran.
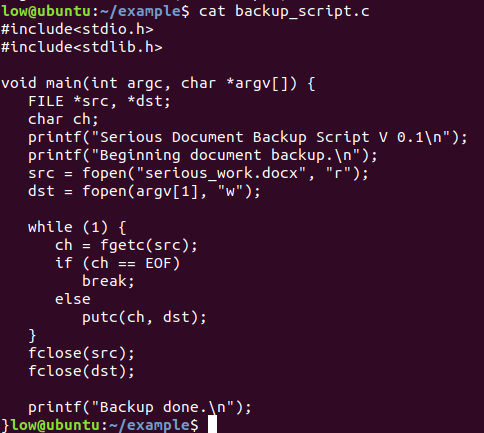
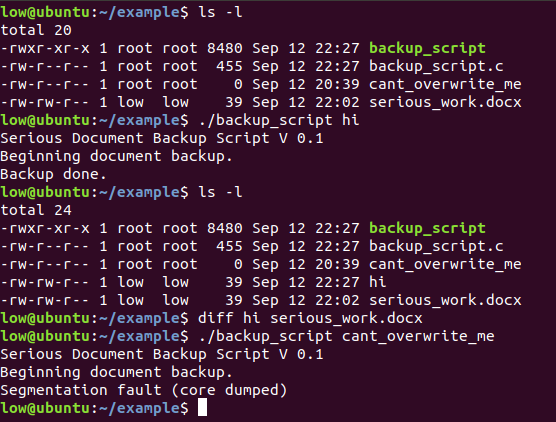
Take a look at the above script. This is used to backup a user’s work to another location. Currently (without capabilities) it can’t overwrite a file cant_overwrite_me that is owned by root. (I know the error says segmentation fault but that’s because I’m too lazy to handle errors properly, trust me it’s permissions!)
Now let’s assume we found the same script but it has the CAP_DAC_OVERRIDE capability added, maybe a sysadmin enabled it without proper consideration to allow the user to backup to a location that they don’t have write access to. Can you see how we might exploit it to gain privs?
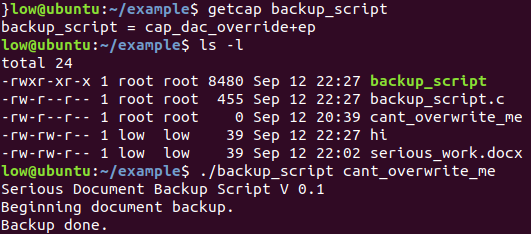
We essentially have write access to anywhere on the machine. We can do any number of nasty things with this, including adding a user to /etc/passwd by overwriting it, or adding an SSH key to /etc/ssh.
Hopefully this can come in useful for you, while usage of capabilities seems to be much rarer than SUID/GUID, it’s still a useful technique to keep in mind.
Exploiting Cron Jobs
If we can find any cron jobs that run as another user/root we may be able to escalate privileges through a misconfiguration
cat /etc/*cron*If we have write access to a file run in one of these cron jobs, we can simply inject whatever code we want and escalate. We may have to try some of the methods just discussed.
Exploiting programs running with higher privileges.
When you get some form of access to a box, you should enumerate what is currently running, but particularly what’s running with higher privileges than you.
ps aux | grep rootIf we’re able to exploit one of these services running as root we can gain root ourselves.
Search online for applicable exploits for the version of software, or common misconfigurations. This next bit might sound a little weird; try checking StackOverflow on how to configure x software (particularly around configuring security related stuff e.g. authorization, backups), and then reading the bad advice a downvoted/low point post can give. This can be a decent way to understand how that software might be likely to be misconfigured.
If you’re unable to find what version the software is from enumerating it on the file system, the package manager of the box will probably tell you.
Ubuntu
apt list --installedDebian (and ubuntu)
dpkg -lCentos/RH
apt list --installedBound network ports
When you get some form of a shell/RCE on a machine you should check which ports are bound internally. These ports on localhost may be different than those exposed to the outside.
Enumerate all of these services. Grab banners with netcat if it’s possible. If it seems like a HTTP based service, you can quickly check it with curl. Even tunnel out the port to your attacking machine with SSH to take a better look at it if needs be. A lot of more “sensitive” services may be likely to only be visible internally on a machine (think databases, administration panels and so on)
netstat -lPlaintext credentials
Keep an eye out for plaintext creds scattered across the box. Good places to look for are in configuration files (.xml,.cfg,.ini etc). Check common places for these, if permissions are set incorrectly you may be able to view sensitive config files with a lower privileged user than intended. Database credentials can be a common find especially with home grown apps.
Moving laterally
If you’re unable to escalate to root with the current account you’re on consider instead seeing if there’s any other users you can escalate to first. Sometimes you need to move sideways before you can move up. This seems to be quite a common step people miss trying when I’m helping them with a CTF. You could spend an hour banging your head trying to gain root in crazy overcomplicated ways only to find that if you had enumerated another user properly too you could have seen that they could just sudo to root without a password because of a dumb misconfiguration/bad practice.
To view other users check the passwd file. A quick way if you’re unsure which users are non-default is to check to see if there’s a shell enabled at the end of the line. (e.g /bin/bash,/bin/sh/,python etc), though this isn’t always true so don’t rely on it 100%.
cat /etc/passwdScripting
These are very useful for quick enumeration, but they are also pretty noisy and you can become reliant on them. Use them if they help, but don’t let them replace your knowledge on how to do things manually.
The OG guide
https://blog.g0tmi1k.com/2011/08/basic-linux-privilege-escalation/
The End
Hopefully some of this post has been useful for you. I may update it over time (I’ll add a last edited). Feedback welcomed, especially if I’ve gotten something wrong!
Last Edited: 17/09/18